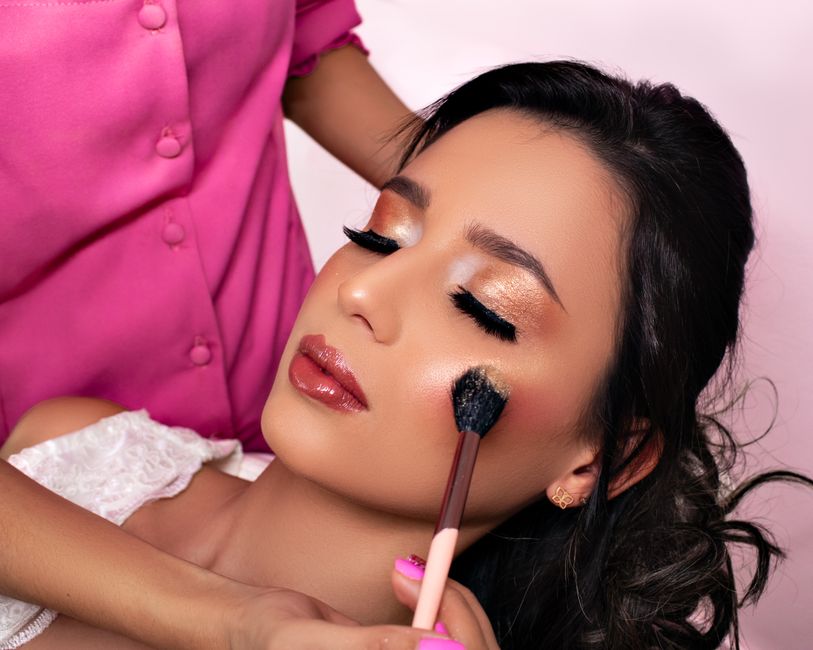
Prepping Your Skin for a Flawless Canvas
Every great **soft glam makeup tutorial** starts long before you open a single product. Your skin is the foundation of everything, and skipping this step is the fastest way to end up with patchy, uneven coverage by noon. Think of skin prep as the secret weapon that separates a polished look from one that just sits on top of your face.
Start by cleansing thoroughly with a gentle face wash to remove oil, dirt, and any overnight skincare residue. Follow immediately with a **hydrating moisturizer** — even if you have oily skin, hydration is non-negotiable because dehydrated skin clings to foundation and emphasizes texture. Give the moisturizer two to three minutes to fully absorb before you move on.
Next, apply a **makeup primer** all over your face, patting it in rather than rubbing. Primer fills in pores, creates a smooth surface, and dramatically extends how long your look lasts. For dry skin, reach for a hydrating or luminous primer; for oily skin, a mattifying or pore-minimizing formula works best.
- **Cleanser** removes surface buildup so nothing interferes with adhesion
- **Moisturizer** plumps skin so foundation glides on without settling into lines
- **Primer** acts as a grip layer between skincare and makeup
- Allow each layer to absorb before applying the next
Quick pick: Compare top-rated Makeup Tutorial options.
Applying Your Base and Concealer
Base application is where **face-beating** truly begins — this step sets the tone for your entire soft glam look. Choosing the right foundation shade is critical; test along your jawline in natural light, not on your wrist, for an accurate match. A soft glam finish calls for a medium-coverage, satin or natural-finish formula rather than something heavy or full-matte.
Apply foundation using a damp beauty sponge or a flat foundation brush, working outward from the center of your face. Bounce the sponge against your skin rather than dragging — this technique sheers out the product naturally and avoids streaks. Blend down onto your neck so there’s no visible demarcation line.
Concealer goes on after foundation in a **soft glam routine** because you’ll need less of it once your base is in place. Dot a brightening concealer in an inverted triangle under each eye, then blend upward and outward. Use a small brush or your ring finger to pat — never swipe — concealer over any blemishes or redness.
- Use a **damp sponge** for the most skin-like finish
- Set undereye concealer lightly with a translucent powder to prevent creasing
- Color-correct persistent redness with a peach or green corrector before foundation
- Build coverage in thin layers rather than one thick application
Shaping Your Brows
Well-groomed brows frame your entire face and anchor a soft glam look without making it feel overdone. For beginners, the goal is **natural-looking definition** — filled in, shaped, but never drawn on or blocky. Matching your brow product to your natural hair color (or going one shade lighter for a softer effect) is the key rule here.
Use light, feathery strokes with a **brow pencil or angled brow brush and powder** to fill in sparse areas, mimicking the look of individual hairs. Work from the inner corner outward, applying the most product toward the arch and tail where brows naturally need the most definition. Step back and check in the mirror frequently — it’s easier to add than to remove.
Finish by brushing through your brows with a **spoolie brush** to blend any harsh lines and soften the overall effect. Lock everything in place with a clear or tinted brow gel, using short upward strokes. This final step makes the difference between brows that look filled-in versus brows that look naturally full.
- **Spoolie brush** is the most underrated brow tool — use it before and after filling
- Avoid drawing a solid line along the bottom edge; it looks unnatural
- Brow gel alone can be enough if your natural brows are already full
- Feather strokes, not harsh lines, define beginner-friendly soft glam brows
Enhancing Your Eyes for Soft Glam
Soft glam eyes are warm, blended, and luminous — never harsh or overdone. This is the step where **face-beating** gets expressive, but the keyword for beginners is *blend, blend, blend*. You’re building dimension with neutral and warm-toned eyeshadows rather than dramatic cuts or graphic lines.
Start by applying a **matte neutral shade** (think warm taupe, soft brown, or a light mauve) all over your eyelid as a base. Then deepen the outer corner and crease with a slightly darker matte shade, blending it in circular motions with a fluffy eyeshadow brush until there are no visible edges. Add a shimmery or satin shade on the center of the lid and inner corner to bring the eyes forward with light.
Line your upper lash line with a **brown or black eyeliner pencil** — a pencil is more forgiving than liquid for beginners and creates a softer effect that suits the soft glam aesthetic. Smudge the liner slightly with a small brush or cotton swab for a lived-in look. Finish with two coats of volumizing or lengthening mascara, wiggling the wand at the root and pulling upward.
| Eyeshadow Zone | Shade Type | Effect |
|---|---|---|
| All-over lid base | Light matte neutral | Evens out lid color |
| Crease and outer corner | Medium to deep matte | Adds depth and dimension |
| Center lid and inner corner | Shimmer or satin | Brightens and opens the eye |
| Highlight bone | Soft highlight shade | Lifts the brow area |
- Use a **fluffy blending brush** for crease work and a flat shader brush for shimmer placement
- Tap off excess shadow before applying to avoid fallout on your concealer
- A white or nude eyeliner on the waterline makes eyes look larger and more awake
- Curl lashes before mascara for maximum lift
Adding Color to Your Cheeks
Cheek color breathes life into a soft glam look and ties together every other step. The goal here is a **natural flush** — warmth, radiance, and dimension without anything looking overdone or costume-like. You’re working with three products: blush, bronzer, and highlighter, each placed intentionally.
Apply a **soft powder or cream blush** to the apples of your cheeks, blending upward toward your temples with a fluffy blush brush. For soft glam, peachy-pink and rosy-mauve shades are universally flattering and photograph beautifully. Less is more on the first pass — tap your brush on the back of your hand to knock off excess before touching your face.
Sweep a **matte or lightly shimmery bronzer** along your temples, under your cheekbones, and lightly across your forehead hairline to add warmth and sculpt the face. Think of it as a “3” shape on each side of your face. Finish with a **pressed or loose highlighter** dusted onto the tops of your cheekbones, the bridge of your nose, and the cupid’s bow for that signature soft glam glow.
- Apply blush **before bronzer** so you can adjust the balance between the two
- Use a fan brush for highlighter to control placement precisely
- Cream blush blends seamlessly over a dewy base; powder blush works better over matte finishes
- Build bronzer gradually — it’s much easier to add depth than to remove it
Perfecting Your Lips
Lips are the finishing touch of any **soft glam makeup tutorial for beginners**, and they don’t need to be complicated. Soft glam lips are polished but wearable — think your natural lip color, elevated with a little definition and shine. The three-step approach of liner, lipstick, and gloss is simple and delivers a high-impact result.
Start with a **lip liner** that matches your natural lip color or the lipstick you plan to wear. Line just outside your natural lip line for a subtle fullness effect, then fill in your entire lip with the liner — this step extends your lipstick’s wear significantly. Blot with a tissue after lining if you want a softer base.
Apply a **soft, creamy lipstick** in a neutral pink, rosy nude, or warm berry, pressing it on with your fingertip for a more natural effect or using a lip brush for precision. For soft glam, mattes can feel too harsh — look for satin or cream finishes that stay comfortable for hours. Finish with a dab of **clear or lightly tinted lip gloss** at the center of your lips to add dimension and a modern glass-lip effect.
- **Lip liner** is the single biggest factor in how long your lip color lasts
- Overlining subtly (just at the outer edge of your natural line) creates fullness without looking exaggerated
- Dab gloss only in the center — too much gloss all over migrates and feathers
- Blot, reapply, then blot again for a long-wear lip that still looks fresh
Setting Your Makeup to Last All Day
All that **face-beating** effort deserves to stay put, and a proper setting routine is how you guarantee it does. Setting spray and blotting papers are the two workhorses of long-wearing soft glam makeup, and neither takes more than 30 seconds to use correctly. This step is non-negotiable if you want your look to survive heat, humidity, or a long day.
Hold a **setting spray** about eight to ten inches from your face and mist in an “X” and then a “T” motion to cover the entire face evenly. Let it dry naturally — don’t fan your face or it will streak. Look for a setting spray labeled “long-wear” or “all-day hold” rather than a finishing mist, which is designed for glow rather than staying power.
Throughout the day, press a **blotting paper** onto oily areas (typically the T-zone) to absorb excess oil without disturbing your makeup. Avoid rubbing — press and lift only. Keep a small pressed powder compact in your bag for any touch-ups, and carry your lip liner and gloss for a quick lip refresh after meals.
- Mist **setting spray** as the absolute final step, after all powder products
- Two to three light passes of setting spray beats one heavy soaking spray
- **Blotting papers** are better than powder for mid-day touch-ups because they don’t build up texture
- Store setting spray in the fridge in summer — the cool mist also tightens pores slightly
Frequently Asked Questions (FAQ)
Q: What is the best way to apply foundation for a natural finish?
A: Use a **damp beauty sponge** and bounce the product onto your skin rather than rubbing or dragging. Start at the center of your face and blend outward, using thin layers and building only where you need extra coverage. A satin or natural-finish formula sheers out most realistically on most skin types.
Q: How can I make my eyebrows look more defined without looking overdone?
A: Use a **brow pencil with a fine tip** and apply feathery, hair-like strokes rather than filling in with solid color. Always brush through with a spoolie after filling to soften and blend, then set with a clear brow gel. Matching your product to your natural hair color — or going one shade lighter — keeps the result believable.
Q: What are some tips for making my makeup last longer throughout the day?
A: The three-step foundation for longevity is **primer before makeup, setting powder on high-movement areas, and setting spray as your final step**. Mid-day, use blotting papers rather than powder to control shine without building up product. Keeping your skincare well-hydrated underneath also prevents makeup from breaking down as quickly.
Q: What tools and products should I buy first to practice this soft glam look?
A: A **damp beauty sponge**, a fluffy blending brush for eyeshadow, and a setting spray are the three tools that make the biggest difference for beginners. On the product side, a medium-coverage satin foundation, a neutral eyeshadow palette with mattes and shimmers, a peachy-pink blush, and a creamy nude lipstick cover everything in this routine. Starting with these core pieces means you can practice the full technique without an overwhelming product collection.
Top Product Recommendations
| Product Name | Rating | Key Feature | Est. Price | Action |
|---|---|---|---|---|
| Top-rated damp beauty sponge for foundation blending | ★★★★★ | Editor-recommended damp beauty sponge for foundation blending from this guide | $18–$42 | Check Lowest Price on Amazon |
| Best-value fluffy eyeshadow blending brush set | ★★★★☆ | Affordable fluffy eyeshadow blending brush set — strong everyday results | $12–$28 | Check Lowest Price on Amazon |
| Premium long wear makeup setting spray | ★★★★☆ | Higher-end long wear makeup setting spray for visible, lasting results | $45–$95 | Check Lowest Price on Amazon |
Affiliate Disclosure: This post contains affiliate links. We may earn a commission if you buy through our links, at no extra cost to you.
Leave a Reply